Enhancing Security with Azure Key Vault & Automated Password Rotation
In the fast-paced world of technology, securing your digital assets is more important than ever. The habit of recycling static passwords on different platforms invites unnecessary security risks. This article delves into the benefits of Azure Key Vault and the practice of automated password rotation, which together provide a robust defence for your digital environment against looming threats.
Using a single password throughout your environment greatly increases the risk of cyber attacks. This habit not only broadens your attack surface but also makes it easier for cyber attackers to breach your systems.
To begin improving your security with automated password rotation, you’ll need the following Azure components:
- Virtual Machine (A Windows 2019 VM deployed in Azure for demonstration purposes.)
- Azure Key Vault (Serves as the secure repository for your automated password secrets.)
- Automation Account (Contains the runbook that manages the password rotation process.)
Let’s assume you’re already familiar with setting up a virtual machine and skip those details.
Azure Key Vault
Azure Key Vault is essential for managing and securing digital secrets, such as passwords. It centralises secret key management, minimising the risk of unauthorised access and exposure.
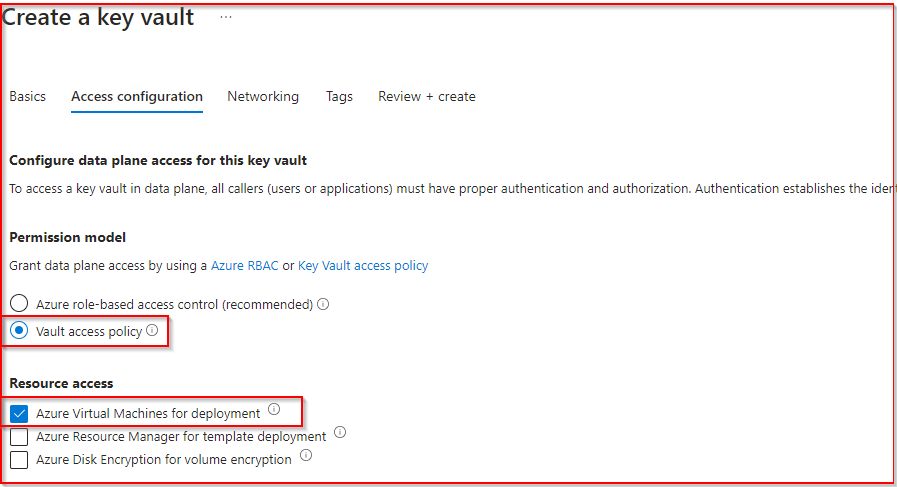
Setting Up Azure Key Vault
- Access the Azure Portal: Sign in to your account.
- Create a Key Vault: Use the marketplace to find “Key Vault” and provide the required information, including name, region, and resource group.
- Configure Access: In the permissions section, choose “Vault Access Policy.” For resource access, select “Azure Virtual Machines for deployment.”
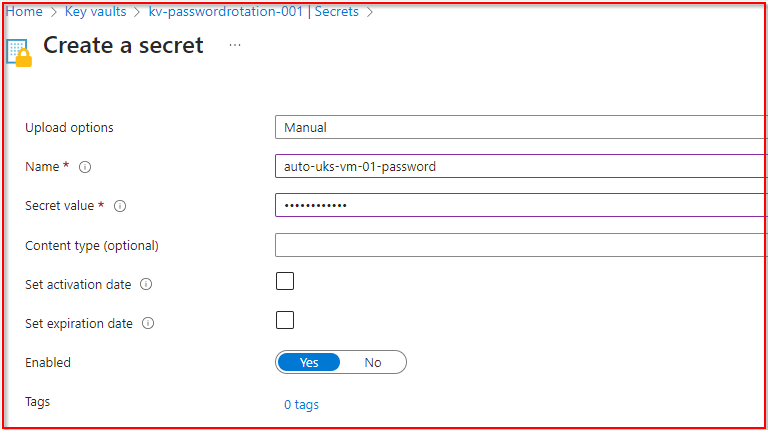
- Manage Secrets: Once created, navigate to the “Secrets” area. Select “+ Generate/Import” to establish a secret for the VM password, specifying both a name and the value.
Step by step guide to Automating Password Rotation
Automating password rotation is essential for security, especially for sensitive roles. Here’s a streamlined guide to setting up this process in Azure using Azure Key Vault for secure password management.
Configuring Azure Automation
- Create an Automation Account: Go to the Azure Portal and set up a new Automation Account, choosing the same subscription and, if you prefer, the same resource group as your Key Vault.
- Advanced Settings: In the advanced section, make sure to enable “System Assigned” identities before finalising the Automation Account creation.
- Import Necessary Modules: The Automation Account requires specific modules to work with VMs and Key Vault. Import
Az.Accounts,Az.Compute, andAz.KeyVaultmodules by going to “Modules” under “Shared Resources” in your Automation Account.
Setting Permissions and Preparing the Runbook
Once you’ve set up the key components, it’s vital to assign the correct permissions for a secure and smooth interaction between your Azure services.
Assigning Necessary Permissions
- Virtual Machine Access: Give the Automation Account the “Virtual Machine Contributor” role for management over the virtual machine.
- Enabling Automation from VM: In the VM’s security settings, find “Identity” and assign the “Automation Contributor” role to the VM, allowing it to work with the Automation Account.
- Securing Key Vault Access: In your Azure Key Vault, go to “Access Policies” and add a new policy with “Get,” “List,” and “Set” permissions for secrets, and allocate this policy to your Automation Account.
Crafting the Runbook
With the permissions set, the next step is to create a runbook in your Automation Account. This runbook will drive the automated password rotation, running scripts to keep your environment secure.
- Initiate Runbook Creation: Find the option to create a new runbook on the Automation Account dashboard and begin the setup.
- Configure Runbook Settings:
- Name: Choose a unique name for your runbook for easy identification.
- Runbook Type: Select “Powershell” to match the scripting language of the automation script.
- Runtime Version: Use the latest stable version, 7.2, for full feature access and compatibility.
- Description: Write a concise description of the runbook’s function and its importance in the password rotation workflow.
Script for Automated Password Rotation
The new automated password will be a 16 character alphanumeric password contains numbers, letters, and special characters.
# Authenticate using Managed Identity
Connect-AzAccount -Identity

# Define variables for your environment
$resourceGroupName = "YourResourceGroupName" # Your VM's resource group
$vmName = "YourVMName"                       # Your VM's name
$vaultName = "YourKeyVaultName"              # Your Key Vault's name
$secretName = "YourSecretName"               # Your secret's name for storing the VM password
$location = "YourVMLocation"                 # Your VM's location
$username = "localadmin"                     # The VM's admin username (change if different)

# Function to generate a new password
function Generate-Password {
    param ([int]$length = 16)
    $characters = 'ABCDEFGHIJKLMNOPQRSTUVWXYZabcdefghijklmnopqrstuvwxyz0123456789!@#$%^&*()'
    $securePassword = New-Object System.Security.SecureString
    1..$length | ForEach-Object {
        $char = $characters[(Get-Random -Maximum $characters.Length)]
        $securePassword.AppendChar($char)
    }
    return $securePassword
}

# Generate a new password and convert it to plaintext for VM extension
$securePassword = Generate-Password
$plaintextPassword = [Runtime.InteropServices.Marshal]::PtrToStringAuto([Runtime.InteropServices.Marshal]::SecureStringToBSTR($securePassword))

# Update the VM's local administrator password
try {
    $protectedSettings = @{ "username" = $username; "password" = $plaintextPassword }
    Set-AzVMExtension -ResourceGroupName $resourceGroupName -VMName $vmName `
        -Location $location -Name 'VMAccessAgent' `
        -Publisher 'Microsoft.Compute' -ExtensionType 'VMAccessAgent' `
        -TypeHandlerVersion '2.4' -ProtectedSettings $protectedSettings
    Write-Output "VM Access Extension set successfully."
} catch {
    Write-Error "Failed to set VM Access Extension. Error: $_"
}

# Store the new password in Azure Key Vault
try {
    $secretValue = ConvertTo-SecureString -String $plaintextPassword -AsPlainText -Force
    Set-AzKeyVaultSecret -VaultName $vaultName -Name $secretName -SecretValue $secretValue
    Write-Output "Key Vault secret updated successfully."
} catch {
    Write-Error "
}
Before running the script, remember to replace the placeholder values with the actual details of your environment. This script automates creating a secure password, updating the VM’s password, and safely storing the new password in Azure Key Vault.
Finalising and Executing Your Automation Strategy
Once your runbook is set up, the following steps involve saving your work, publishing the runbook, and starting the password rotation process. These steps are key to enhancing your system’s security through automation.
Saving and Publishing the Runbook
- Save Your Work: After inputting the script and setting up the runbook, make sure to save your progress. This step ensures the script is preserved for future modifications or evaluations.
- Publish the Runbook: Publishing activates your runbook and prepares it for use. This important step changes your runbook from a draft to an operational script that can automate the password rotation process.
Executing the Runbook
- Run the Runbook: Begin the runbook to initiate the automated password rotation. This action will create a new password, assign it to your virtual machine, and record the new password secret in Azure Key Vault.
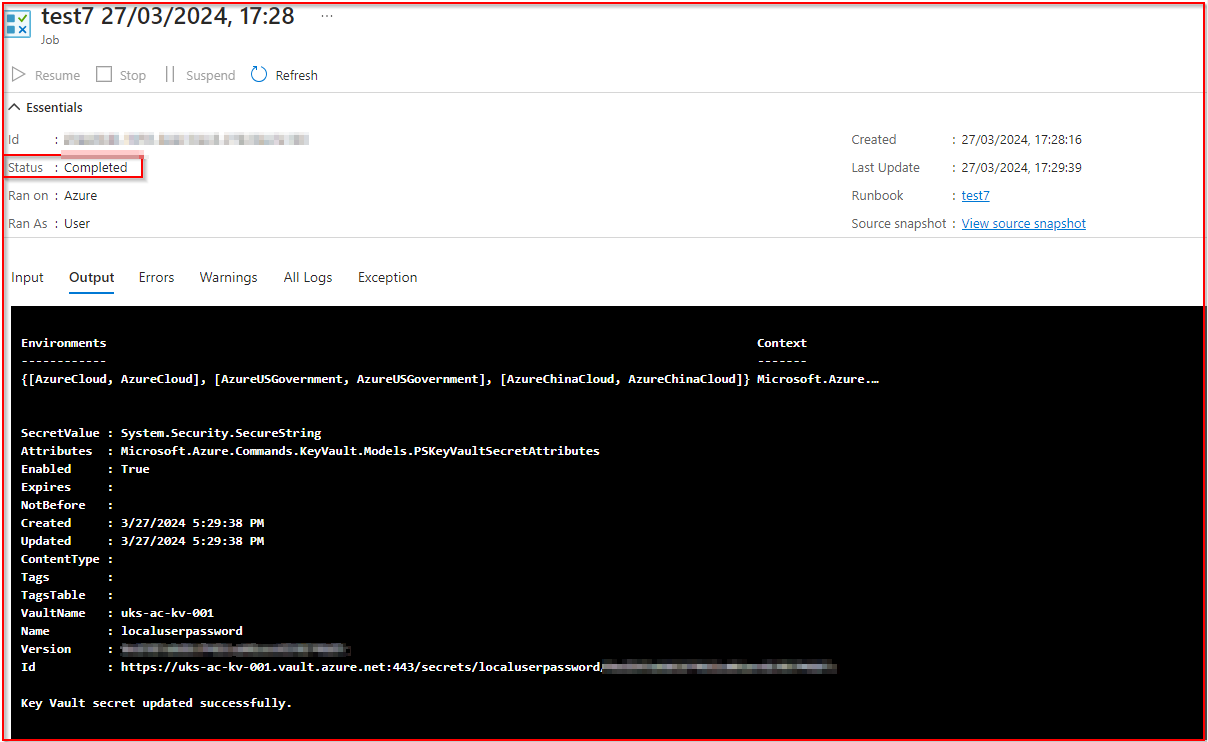
Monitoring Execution and Outputs
Keep an eye on the runbook’s execution status after starting it. A ‘Completed’ status indicates that the password rotation has been successfully executed.
- Successful Execution: A ‘Completed’ status confirms that the automated process has effectively updated the VM’s password and recorded the new credential in Azure Key Vault without any problems.
- Troubleshooting Failures: If you come across a ‘Failed’ status, you might need to review the script and verify the placeholder variables or configuration settings for errors. It’s essential that all values correctly represent your Azure setup for the automation to work properly.
Automating for Consistency
To fully automate and continuously enhance security, you can set the runbook to execute on a regular schedule. This ensures that your virtual machine’s password is consistently updated without needing manual input.
Retrieving Your Updated Password from Azure Key Vault
- Navigate to Azure Key Vault: Log into the Azure Portal and proceed to the Azure Key Vault where the password secret is stored.
- Access the Secrets Section: In the Key Vault, find and select the “Secrets” section, which displays all managed secrets.
- Find Your Secret: Search for the secret name you used for the VM’s password, which was determined during the Key Vault and script setup.
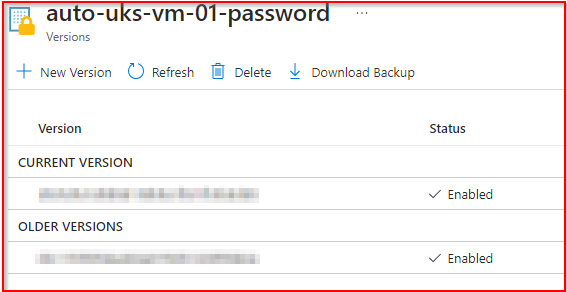
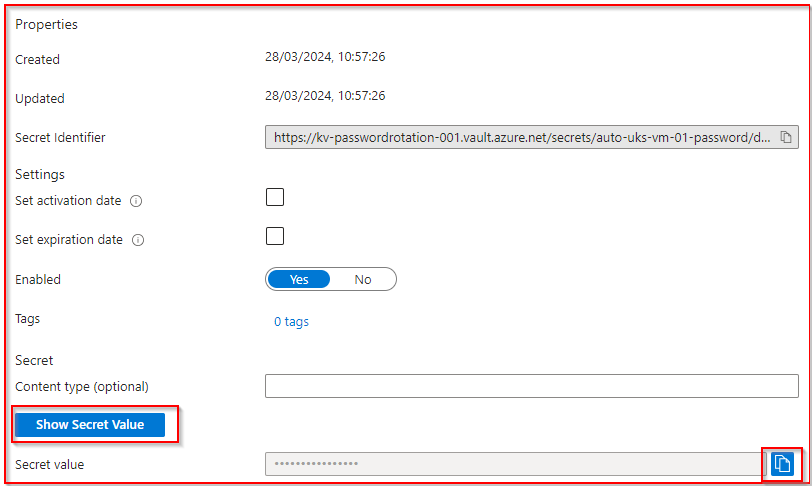
- View the Secret Version: Click on the relevant secret for the VM’s password. If the password has been rotated multiple times, you’ll see various versions, with the latest one being the current password.
- Show Secret Value: To see the password, choose the most recent secret version and click “Show Secret Value.” You can then use this password for VM access or other required tasks.
The Integration of Azure Key Vault with automated password rotation presents a formidable strategy to fortify your security infrastructure. By adopting this approach, you not only make it more challenging for cyber threats to infiltrate but also significantly diminish the risks associated with static passwords. This aligns seamlessly with the best practices for cloud identity and access management, ensuring a robust defence against potential digital threats.
Our Azure Cost Reduction Workshop takes this concept further by empowering organisations to optimise their cloud spending while enhancing operational efficiency and strengthening security and compliance postures. Led by Azure experts, this workshop offers a proactive consultative service that delves into the specifics of Azure pricing, including any concealed costs. It’s an opportunity to gain insights from seasoned professionals on managing cloud expenses effectively, ensuring that your security measures do not come at the expense of financial efficiency.